



Purchase Webhook Logs
V1.1.0 adds purchase logging and webhook support for Clove purchases.
Welcome to the official documentation for Clove Outfit System V1.1.0. Use this site to install the latest release, update an existing installation safely, configure the system, review features, and check current known issues.
Save a backup of your place first. Existing V1.0.0 users must use the V1.1.0 Already Installed updater instead of running the First Install process.
Follow the complete first-time installation process.
02Upgrade without losing your game settings.
03Adjust interaction, UI and gameplay behaviour.
Watch previews of Clove Outfit System and see how the system looks in-game.
Use this process only when Clove is not already installed in the experience. The complete V1.1.0 model contains a disabled ReadMe (First Install) script with the installer command.
Do not run the first-install installer. Follow Updating Clove and use the disabled ReadMe (Already Installed) script included in the V1.1.0 model.
Save your place before installing Clove and make sure you are not currently running a playtest.
Open File → Experience Settings → Security and enable Allow HTTP Requests, Enable Studio Access to API Services, and Allow Third Party Sales.
Select Workspace and change SignalBehavior from Default to Immediate.
Insert Clove Outfit System V1.1.0 and do not manually ungroup anything inside the model.
Open the disabled ReadMe (First Install), copy the entire installer command, paste it into Roblox Studio's Command Bar, and press Enter. A successful install prints [CLOVE] INSTALLATION COMPLETED SUCCESSFULLY.
Set the Value of ServerScriptService.AuthKey to your Clove license key. Do not rename, move, or publicly share the AuthKey.
Every outfit must be its own uniquely named rig Model containing a HumanoidDescription. Store rigs in ServerStorage.OutfitStorage or leave them in Workspace.Outfits, depending on your configuration.
Configure features in ReplicatedStorage.CoreStorage.Settings.GameSettings. Catalog Product IDs are stored in ReplicatedStorage.CoreStorage.Library.Shared.Catalog.ProductIdsModule.
Confirm authorization succeeds, outfits load correctly, UI and avatar features work, purchases/cart/favorites behave correctly, items and ItemStands work, leaderboards load, and player data saves and loads without red Clove errors.
Use the V1.1.0 Already Installed updater only when Clove is already installed. The updater replaces the Clove system files while preserving important game content and creating configuration backups.
Insert the complete Clove Outfit System V1.1.0 model, do not manually ungroup it, and do not run the updater while a playtest is active.
ServerScriptService.AuthKeyServerStorage.OutfitStorageWorkspace.Outfits, Workspace.Items, and Workspace.ItemStandsStarterPlayerScripts and ServerScriptService, unless they use the exact name of a V1.1.0 Clove file being replaced.Before replacing CoreStorage, the updater backs up your previous configuration to:
ServerStorage
└── CloveV1_1_0UpdateBackup
    ├── READ ME - RESTORE SETTINGS
    ├── GameSettings_OLD
    └── ProductIdsModule_OLD
Do not replace the new V1.1.0 GameSettings with GameSettings_OLD. Use the old module only as a reference and manually restore the values you previously configured so all new V1.1.0 settings and tables remain intact.
Insert the complete V1.1.0 model and open its disabled ReadMe (Already Installed) script.
Copy the entire updater command from the ReadMe into the Roblox Studio Command Bar. A successful update prints [CLOVE] UPDATE COMPLETED SUCCESSFULLY.
You may copy all contents of ProductIdsModule_OLD into the new V1.1.0 ProductIdsModule.
Compare GameSettings_OLD with the new module and manually restore your previous group, UI, audio, feature, prompt, asset, icon, and storage settings.
Legacy Items and ItemStands previously stored under CoreStorage.Templates are automatically migrated into Workspace before the old CoreStorage is removed.
The updater replaces all contents inside StarterGui.CoreUI, including the HUD, with the V1.1.0 structure.
Keep ServerStorage.CloveV1_1_0UpdateBackup until your configuration is restored and V1.1.0 has been fully tested.
Do not run the updater repeatedly. Once V1.1.0 has been applied successfully, use the installed system normally.
Clove's main configuration module is ReplicatedStorage.CoreStorage.Settings.GameSettings. Use it to configure optional systems, UI behaviour, audio, interaction settings, storage, branding and other experience-specific options.
Do not paste your entire old GameSettings over the V1.1.0 module. V1.1.0 contains new required tables and options. Use GameSettings_OLD as a reference and manually restore your customised values.
Catalog Product IDs are configured separately at ReplicatedStorage.CoreStorage.Library.Shared.Catalog.ProductIdsModule. Existing-install updates back up the old module as ProductIdsModule_OLD, and its complete contents may be copied into the new ProductIdsModule.
GameSettings.Favorites = {
    Enabled = true,
}

GameSettings.Cart = {
    MaxItems = 20,
}

GameSettings.UI = {
    SprintButton = {
        Enabled = true,
        WalkSpeed = 17,
        RunSpeed = 45,
    },
}
Clove V1.1.0 includes the complete outfit/catalog system plus new logging, UI, bundle, compatibility and performance improvements.
V1.1.0 adds purchase logging and webhook support for Clove purchases.
Updated Item Loader interface and features for a cleaner item inspection flow.
Configure supported special bundles so selected bundles can be excluded from the displayed total amount and Buy All flow.
Updated leaderboard appearance, lighting, sizing and shape.
Improved camera behaviour when switching between R15 and R6.
Fixes limitations affecting newer Roblox item IDs, including cart ownership/removal behaviour.
Updated hover, open and close tweens with a more responsive pop-in feel.
Various client and server optimisations across the system.
More scripts are left unobfuscated and internal code has been reworked for compatibility, maintainability and runtime stability.
Try outfits, try on individual items, purchase items, bulk purchase complete outfits, and hover over preview items.
Fully configure the system to match your experience, branding and gameplay requirements.
Includes a total item count, Clear Cart control, and Purchase All support for every item currently added.
Supports both Roblox avatar rig types throughout the system.
Supports standard bundles, animation pack bundles and dynamic heads automatically.
Tracks purchases and total spent, including highest price, lowest price, recent purchases and all items.
Try on, purchase, or add complete animation packs to the cart.
Try on, purchase, or add emotes to the cart.
Includes Most Purchases, Most Spent, Most Donated and Live Purchases leaderboards.
Switch between all-time or monthly rankings for purchases, spending and donations.
Manage currently worn items, skin tones, avatar scales and switching between R15 and R6.
Save outfits to your favourites so you can return and purchase them another time.
Restore the player back to their original Roblox avatar.
Hover over an item or emote to display a clean 3D viewport preview.
Configurable click, hover, purchase and donation sound effects through GameSettings.
Preview items on stands, then purchase, try on or add them to the cart.
Includes a sprint control with configurable movement speed in GameSettings.
Includes purchase particle effects and favourite outfit particle effects.
Load any Roblox player's saved outfits directly into the system.
Save as a new Roblox outfit or overwrite the current avatar appearance.
Displays headshot, display name, username, Robux spent and total purchases.
Play, pause, repeat, shuffle, skip, go back, mute and control volume.
Use configurable outfit poses, idle animations and emotes.
Topbar control for switching the experience between day and night.
Prompts players without Roblox Plus to purchase it and potentially save Robux on item purchases.
Shows owned item indicators and Limited or Limited U badges on supported items.
These are confirmed V1.1.0 issues currently being tracked. If an issue is not listed here, please still create a Bug Report / Support ticket rather than assuming it is already known.
When loading into a Studio playtest or a Roblox game using Clove, there can currently be an approximately six-second wait / lag spike during startup.
Stopping a Studio playtest can occasionally feel laggy and may take a few seconds to finish shutting down.
Make a Bug Report ticket with all the details and screenshots or a video clip if possible.
Common Clove setup questions, configuration guides and useful Studio scripts.
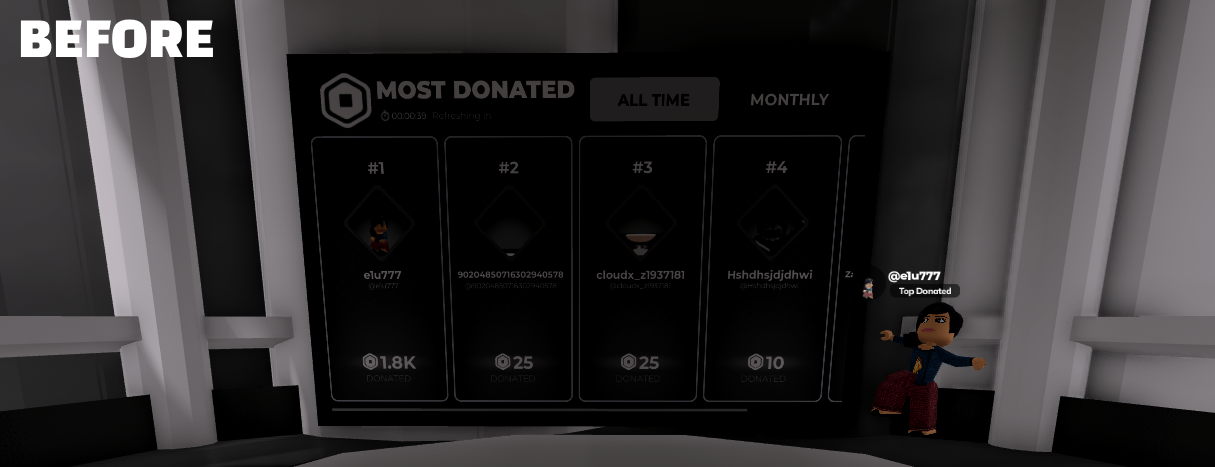
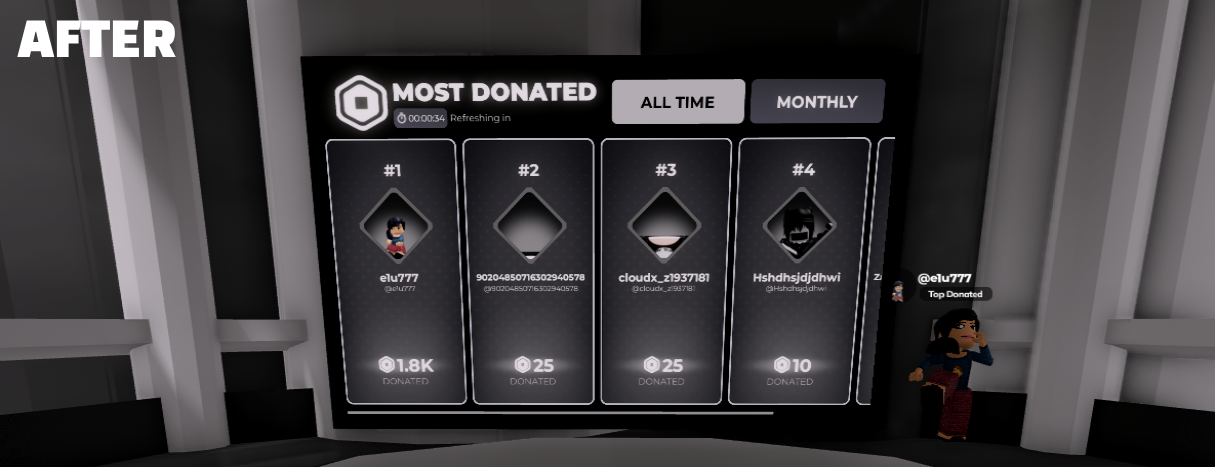
Are the Leaderboards looking too dim under certain lighting conditions?
In Roblox Studio go to:
Workspace -> Leaderboards
Then open each of the following parts:
LeaderboardBuyerLeaderboardSpenderLeaderboardLiveLeaderboardDonatedInside each part select the SurfaceGui and set:
SurfaceGui.LightInfluence = 0
SurfaceGui.Brightness = 1.2
Could also be set to what brightness works best according to your game.
Workspace.Items?Run this inside the Studio Command Bar:
local InsertService = game:GetService("InsertService")
local ReplicatedStorage = game:GetService("ReplicatedStorage")
local Workspace = game:GetService("Workspace")

local ITEM_ID = 62246484 -- change this

local ItemsFolder = Workspace:FindFirstChild("Items")

if not ItemsFolder then
    local CoreStorage = ReplicatedStorage:FindFirstChild("CoreStorage")
    local Templates = CoreStorage and CoreStorage:FindFirstChild("Templates")
    ItemsFolder = Templates and Templates:FindFirstChild("Items")

    if ItemsFolder then
        ItemsFolder.Parent = Workspace
    else
        warn("Could not find Items in Workspace or ReplicatedStorage.CoreStorage.Templates")
        return
    end
end

local success, assetModel = pcall(function()
    return InsertService:LoadAsset(ITEM_ID)
end)

if not success or not assetModel then
    warn("Failed to load item:", ITEM_ID)
    return
end

local importedItem = nil

for _, descendant in ipairs(assetModel:GetDescendants()) do
    if descendant:IsA("Accessory")
        or descendant:IsA("Tool")
        or descendant:IsA("Model") then

        importedItem = descendant
        break
    end
end

if not importedItem then
    warn("No item found inside loaded asset:", ITEM_ID)
    assetModel:Destroy()
    return
end

local itemName = importedItem.Name

local wrapper = Instance.new("Model")
wrapper.Name = itemName
wrapper.Parent = ItemsFolder

importedItem.Parent = wrapper
importedItem.Name = itemName

local itemIdValue = Instance.new("IntValue")
itemIdValue.Name = "ItemId"
itemIdValue.Value = ITEM_ID
itemIdValue.Parent = wrapper

local originalParentValue = Instance.new("StringValue")
originalParentValue.Name = "ItemOriginalParent"
originalParentValue.Value = "Workspace.Items"
originalParentValue.Parent = wrapper

assetModel:Destroy()

print("[CLOVE] Created item:", wrapper:GetFullName())
Replace 62246484 with the Roblox catalog item ID you want to import:
local ITEM_ID = 123456789Your Items folder will already be located in one of these places:
Workspace.ItemsReplicatedStorage.CoreStorage.Templates.ItemsIf the folder is currently inside ReplicatedStorage.CoreStorage.Templates, the script will automatically move it into Workspace before importing the item.
After running the script, you must manually position the imported item on top of one of the item stands inside:
Workspace.ItemStandsIf you cannot see the ItemStands folder, it may currently be located inside:
ReplicatedStorage.CoreStorage.Templates.ItemStandsHopefully this gives you a better understanding of how to set up items.
Still having issues? Create a Support / Bug Report ticket.
Run this inside the Studio Command Bar:
local outfits = workspace:FindFirstChild("Outfits")

if not outfits then
    warn("Workspace.Outfits was not found")
    return
end

local added = 0
local skipped = 0

for _, outfit in ipairs(outfits:GetChildren()) do
    if outfit:IsA("Model") then
        if outfit:GetAttribute("AnimationId") == nil then
            outfit:SetAttribute("AnimationId", 0)
            added += 1
        else
            skipped += 1
        end
    end
end

print(("Added AnimationId to %d outfits. Skipped %d existing outfits."):format(added, skipped))
This adds an AnimationId attribute with the value 0 to every outfit model inside Workspace.Outfits that does not already have the attribute.
You can replace 0 with:
For example, replace:
outfit:SetAttribute("AnimationId", 0)with:
outfit:SetAttribute("AnimationId", 123456789)Any outfits that already have an AnimationId attribute will not be changed.
Important: These must be Developer Product Passes, not Game Passes.
ProductIdsModuleIn Roblox Studio go to:
ReplicatedStorage
└── CoreStorage
    └── Library
        └── Shared
            └── Catalog
                └── ProductIdsModule
You can also just search for ProductIdsModule in the Explorer search bar.
Inside the module you’ll see a list of Product IDs with comments next to them showing what donation amount each one is for example:
return {
    1234567890, -- 100 donation
    2345678901, -- 250 donation
    3456789012, -- 500 donation
}
The IDs already inside the module are only examples so you’ll need to replace them with IDs from your OWN experience.
Go to your experience in the Roblox Creator Dashboard then open:
Monetization → Developer Products
Your link should look something like this:
https://create.roblox.com/dashboard/creations/experiences/YOUR_EXPERIENCE_ID/monetization/developer-productsJust replace YOUR_EXPERIENCE_ID with the ID of your own experience.
Create one Developer Product for every donation amount you want to use.
Repeat this for every donation amount you want in the system.
ProductIdsModuleGo back to ProductIdsModule and replace each example ID with the matching Product ID from your own experience.
For example:
Before:
1234567890, -- 100 donationAfter:
9876543210, -- 100 donationKeep the comment next to the ID so you know which donation amount it belongs to.
If you want to use one of the donation amounts that is commented out, remove the two dashes and replace the 0 with your Product ID.
Before:
-- 0, -- 200R$After:
9876543210, -- 200R$Only enable donation amounts that you have actually created a Developer Product for!
0.return { at the top or the closing } at the bottom.If something does not work, double check that the Product ID is correct and belongs to the your experience it was made under, and is enabled for sale, and is not still commented out.
Still Need Help?
If donations are still not working or you find a bug, create a Support / Bug Report ticket.
Use this script to automatically rename every outfit Model inside Workspace.Outfits to Outfit1, Outfit2, Outfit3, and so on.
Workspace.Outfits.local outfitsFolder = workspace:FindFirstChild("Outfits")
assert(
outfitsFolder,
"[CLOVE] Workspace.Outfits could not be found."
)
local outfits = {}
for _, item in ipairs(outfitsFolder:GetChildren()) do
if item:IsA("Model") then
table.insert(outfits, item)
end
end
table.sort(outfits, function(a, b)
return a.Name:lower() < b.Name:lower()
end)
for index, outfit in ipairs(outfits) do
outfit.Name = "__CLOVE_TEMP_OUTFIT_" .. index
end
for index, outfit in ipairs(outfits) do
outfit.Name = "Outfit" .. index
end
print(
("[CLOVE] Successfully renamed %d outfit models.")
:format(#outfits)
)Note: This only renames direct child Models inside Workspace.Outfits. It will not rename folders, scripts, or other objects.
Clove Outfit System V1.1.0 is the current release, adding new features, system improvements, optimisations, UI changes and fixes across Clove.
Existing installations must use the disabled ReadMe (Already Installed) updater included in the V1.1.0 model. It preserves the AuthKey, outfit storage, Workspace outfits/items/item stands and backs up the old GameSettings and ProductIdsModule before replacing the required system files.
Version 1.0.0 marked the official release of Clove Outfit System, introducing the complete system and its core experience made for perfection to satisfy player's shopping experiences.